Recipes

Search This Blog

Tuesday, August 23, 2011

Chugging Along...With Some Oat Soda Bread


So...where was I? Oh yes, I'm back from Europe and my visit to the Midwest (about a month now), and I have tried to focus all of my mental, emotional and physical energy into the one thing I REALLY need to be working on: my script. Are you surprised? I wouldn't think so, considering I've been talking about my writing for the past millenia (or at least it feels that way). Writing is a wonderful art, and my first love, but I can't help but start to feel antsy. Honestly, since August of 2009, I haven't had such a huge amount of time for me to do whatever I please. By the end of summer, I'm going to see about getting a part-time job, hopefully in development or in writing. Might help to stave off the cabin fever. ANYWAY, you could hardly care about that with such pretty pictures of bread loaves distracting you. This, my friends, is my first attempt at soda bread, and even though I'm not really sure what the original version tastes like, I'm never going back. It's only oat soda bread for me from here on in. 


I've stayed away from bread making because I honestly have a sub-concious aversion to anything that needs yeast. I assume if a recipe calls for yeast, it's going to take centuries to make, and will use every pot and pan in the house. I know this is an irrational fear. And I have known for a while that soda bread is a "quick bread", meaning it doesn't use yeast as a levener, but still, I decided not to bother. Until along comes this really intriguing recipe from 101 Cookbooks that I finally couldn't pass up. It was a lazy evening, and I had a box of oats I wasn't doing anything with, so why not. And oh man, the oats. Seriously the oats are really what give this bread its wonderful flavor. It's toasty, hearty, and all around delicious. Take a fresh baked piece of this bread, slather it with soft butter...oh man...maybe I should make another loaf right now...


The one thing I will say about this bread is that processing the oats down to the point where they reach a flour-like consistency is not easy. Be patient, I took the better part of an hour processing, sifting, then processing again to get my oats to where they needed to be. I promise your patience will be rewarded. The rest of the recipe is a snap to whip up. Just that damn oat flour is a bit of a bitch, but as soon as you cross that hurdle, it's smooth sailing.
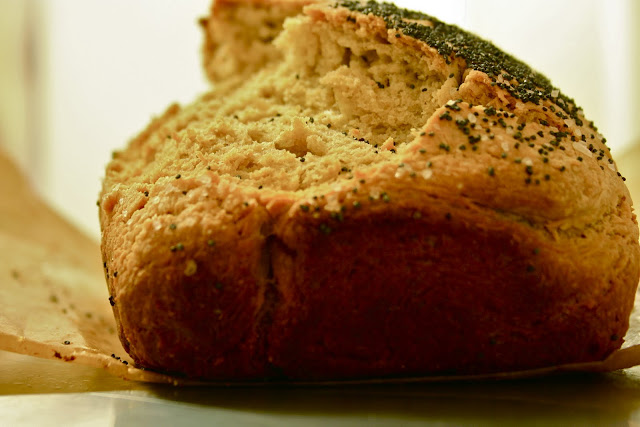
Not sure if you can tell, but there's a big chunk of crust taken out of the left half of this loaf. I couldn't wait to take pictures.
Now you can put whatever you like on top. I happened to have poppy seeds, and felt that a bit of sea salt would add a nice kick. I was right. I'd recommend adding a touch more salt to the top regardless of your seed combination, for an extra kick of flavor. And I will definitely be keeping a few more seeds around the house to play more with the crust. I might even be tempted to add a few in the dough, to be honest. Why not live a little. But first, I need to get 10 more pages down on paper. Then I can reward myself with bread.


2 cups rolled oats (or a scant 2 cups oat flour)
2 ¼ cup flour
1 ¾ tsp baking soda
1 ¼ tsp sea salt, plus extra for top
7 tbsp powdered buttermilk
1 ¾ cup water
1 tbsp honey
butter (for pan and for top of loaf)
a variety of seeds (caraway, poppy, sesame, etc.)

Preheat oven to 400 degrees and center rack in middle. Butter and line a loaf pan with parchment paper.

Make oat flour by pulsing oats in a food professor till it becomes a fine powder.

Sift flours, baking soda, salt and buttermilk powder into a large bowl. Make a well in the flour and pour in water. Drop the tbsp of honey in there too. Stir still ingredients just come together as a dough. Turn out onto a lightly floured counter and knead for about 30 seconds, until the dough comes together as a cohesive, slightly flattened ball without any cracks or fissures. If your dough is a bit too dry, add a splash of water just a bit at a time.

Ease the dough into the pan and brush top with melted butter (or cream) and sprinkle generously with the seeds and some extra sea salt. Bake for about 30 minutes, then move rack up a level so the top gets nice and toasty. Bake another 20 minutes, or until a hard crust forms and the bread is baked through. It will feel solid and sound hollow when you knock on it. After it’s cooled for about 10 to 15 minutes in the pan, life carefully out and allow to cool on a wire rack. 

Monday, August 15, 2011

I've Been Gone for So Long...Double Mint Chocolate Chip Ice Cream


You thought I was one of those "fairweather food bloggers" didn't you? I leave for months without a trace, which means I've obviously have lost interest. Not so. The past few months have been...eventful. I have finished classes at NYU's Grad Film program (still need to make a thesis film, more on that later), I spent 7 weeks in Europe and walked across Spain (photos and stories to come), I worked as a line producer on an NYU thesis film and made some amazing friends, and I am rewriting my feature script from scratch. So it's safe to say...I've been a tad busy.

But I'm back! And with so much to tell you all, and so many recipes to share. Actually, funny enough, I somehow have photos and recipes of several things I made before I left stored up in my folders, so I'll try and make up for lost time by giving you guys more than the usual weekly entry. At least for a little while. Oh! And a horrible thing happened on my travels: I lost my trusty digital SLR. I know, I'm an idiot. It hurts me every single time I think about all the wonderful memories that are now being flipped through by some random Spaniard.

Anyway, let's start off again with a wonderful recipe that I'm going to give you guys right in the nick of time. We've still got some hot weather hanging about, so who feels like enjoying a rich, delicious, yet still completely refreshing homemade mint chocolate chip ice cream? I certainly do. This may be some of the best mint ice cream I've ever tasted. And I'm a BIG fan of mint chocolate chip. The combination of both spearmint and peppermint really gives a lot of depth, and the extract gives it that slight extra punch to make it a MINTY ice cream. And of course, no mint ice cream is complete without a little bit of dark chocolate mixed in. I use plain old Trader Joe's bittersweet, but any kind you feel like adding is fine.

Oh, in case you're wondering if I suddenly, in a spurt of anger towards this unbearably hot summer, bought an ice cream maker for my tiny kitchen, let me explain. My parents went to William Sonoma to buy a juicer, and came back with an ice cream maker. If you're confused, then that makes two of us. At any rate, my mom started making a new ice cream flavor every two or three days, to the point where we ended up with four different cartons of ice cream stuffed into our freezer. Things were getting deliciously out of control. Honestly, it's criminal how easy it is to make homemade ice cream. These little machines should be outlawed. When I speak to her next, I'll make sure to get her recipe for mango and kulfi (Indian ice cream) and share them with you.

Alright, I've got to get back to writing another 90 pages of a script. Please send me some ice cream when you can, I'm going to need a snack soon.

Don't mind the strangely blue coloring. My sister and I took the opportunity to play with food coloring while we were cooking.


Double Mint Chip Ice Cream (based on David Leibovitz)

3 cups heavy cream
¾ cup sugar
5 egg yolks
1 cup loosely packed peppermint leaves
1 cup loosely packed spearmint leaves
Pinch of salt
Splash of vanilla
Splash of peppermint extract (optional)
1/3 cup dark chocolate chopped fine

Combine 2 cups of cream with the sugar and salt in a stockpot and set over medium low heat. Stir. Gently crush mint leaves in your hands and add to pot. Let mixture come to ALMOST a simmer and turn off. Leave to steep for about 2 hours (you can taste every now and then to see if the mixture is as minty as you’d like).

Spoon out mint leaves and squeeze any excess liquid into the cream mixture. Add a bit into the eggs and whisk together vigorously. Add back into pot and set on medium low heat. Stir until mixture has thickened enough to coat the back of a wooden spoon. Take off heat and strain into a clean bowl. Add vanilla and extra cup of cream and mix to combine. Taste. If you’d like more minty flavor, add a touch of peppermint extract.  Chill completely in fridge for at least 4 to 5 hours, or overnight.

Freeze according to ice cream machine manufacturer’s directions. When ice cream is almost completely done mixing, add chocolate.